Interactive, Asynchronous On-line Discussions

A guest post by Nance S. Wilson, State University of New York at Cortland

This post describes how teachers can engage students in interactive, asynchronous on-line discussions. These discussions not only play an important role in online and hybrid classes; but are critical to assuring active participation by students. On-line discussions can also enhance students’ academic performance (Althaus, 1997), and promote higher-order thinking and critical thinking skills when discussion activities are properly designed (Larkin-Hein, 2001).

However, assuring that asynchronous discussions are truly interactive is a difficult proposition as students are often concerned with their grades and completing their assignments. Sun and Gao (2016) identified issues with the traditional threaded discussion forums because “the chronological and hierarchical structure fails to show the interrelationships of postings or the importance of threads, which may prevent effective discussions from happening” (p. 73).

Therefore, the instructor must use a variety of tools to design the discussion in a manner that compels students to interact with each other (Maddox, 2012; Wood & Bliss, 2016).

My research has revealed two important tools for this structuring in an online course. The first tool is the design of the discussion itself.  The second is the application utilized to facilitate the discussion.  This is true whether the asynchronous discussion occurs in a hybrid or completely on-line setting. The lessons reported in this post are from an on-line disciplinary literacy class with graduate and undergraduate students.

Interactive, asynchronous discussions should be designed around giving students multiple opportunities to collaborate around a single text and/or topic.  In my study of the on-line literacy class, students were asked to complete a series of activities around a textbook (Kane, 2011). For instance, when reading Chapter 3, students were given the following directions:

This is a collaborative reading activity. That means that you will work with your collaborative reading group in OneNote. You will also keep personal notes in your Collaborative Reading Personal Notes Journal. 

Go to Chapter 3 of the Kane textbook. 

Skim the chapter. 

Create three of your own questions to guide your reading of the chapter. (Note: In an earlier module students were introduced to Bloom’s Taxonomy and what makes a good question.)

Using OneNote, visit the Collaborative Reading Group. Share all of your questions with your small group by midnight September 29th.  You should also share the following with your group:  

  • Think about how you interact with your textbooks. Do you always read assignments? Why, or why not?
  • Do your teachers actually show you how best to read and use your textbooks?
  • Is it necessary to read the textbooks in order to do well in the classes?
  • Do your teachers know when a significant percentage of students don’t read the assigned material? If so, what is their reaction? Do they do anything about it, or try to find out why the text wasn’t read? Are there consequences?
  • What will you do if your students don’t read the textbook assignments you give? (Kane, 2011, p. 58)

Note/Mark the questions in the group collaboration space that you believe will help you comprehend the chapter and tell your group mates why. This happens asynchronously.

The discussion leader will use what you say about the questions to determine 3 to 5 questions you will answer beyond the guiding questions presented below. This needs to be completed by midnight September 30th.

Read the chapter individually. As you read, find the answers to your questions, answer the question below, and take notes in your Collaborative Reading Personal Notes Journal create a new journal entry and make sure that you include your responses to the questions from your group citing specific information from the reading and looking for ideas to use in your future classroom as well as personal notes to help develop your understanding of the chapter.

Also, answer the following question: 

Imagine that you are being interviewed for a teaching job in your content area. The search committee, consisting of a principal, a curriculum coordinator, and several teachers, informs you that the school you hope to work in has a policy of using no textbooks! They ask you to surmise what the philosophy underlying this decision might be and ask you what kinds of materials you would use and how you would teach under these circumstances. Write in your Journal, thinking through how you might envision your job and answer your interviewers (Kane, 2011, p. 85). 

After reading go back to your group collaboration page (OneNote) for the readings and share three things with your group:   

  1.  any problems you had with any of the questions
  2. a response to one question created by your group (not previously answered in the collaboration section by a member of your group)
  3. something from the reading that you can use in your future classroom or that you wish you had in school or that made you think about reading in your discipline.  

After sharing with your group, respond to at least one group member regarding their after-reading posts.

Notice that the directions encourage students to engage in multiple discussion opportunities with their peers. The first begins around a pre-reading of the chapter.  During reading, the students are working independently in a traditional BlackBoard journal (see figure 1).

Figure 1

Figure 1: Excerpt from a BlackBoard Journal

After reading, students return to their group to share their thoughts and talk asynchronously.  The back and forth of the actual assignment around the reading models both the interactive reading process and requires that students share with one another their reading process. It is important that students share their thinking processes because this helps to develop their metacognitive thinking about the content as well as the reading process (Paris & Winograd, 1990, Garrison, 2003; Akyol, & Garrison, 2011). Thus, the design of the discussion facilitates the students as they engage in interactive conversations and helps to build thinking and learning in an on-line environment (Wood & Bliss, 2016).

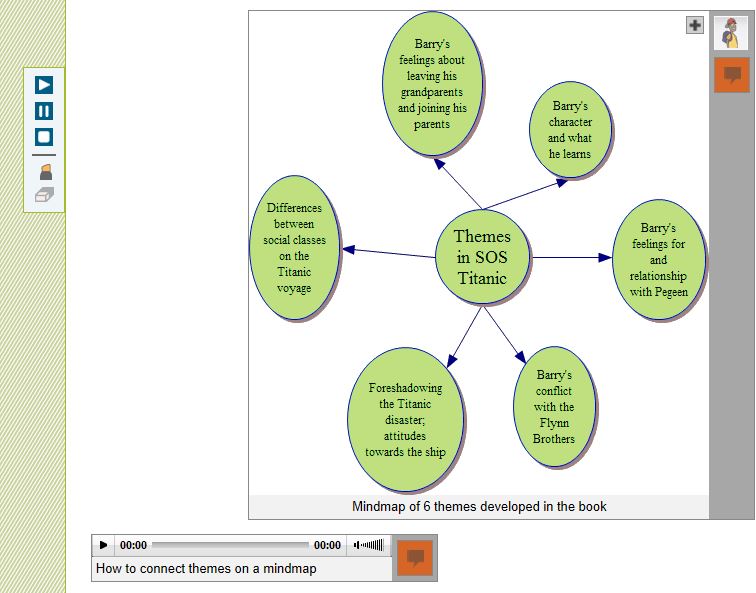
The second tool, Microsoft OneNote, was chosen because it offers students opportunities to move beyond the vertical written asynchronous discussion.  In order to facilitate the discussion, the instructor divides the students into small groups and then sets up a notebook for each small group of students.  In OneNote student notebooks, there can be pages and subpages to differentiate between sections.  For instance, each module can have a page.  Then within the module page students can set up sub-pages for before, during and after reading tasks to be completed with the group.  On each page, students post into text boxes.  They can place their text boxes vertically and horizontally (See Figures 2 & 3).  Students can also insert audio comments (See Figure 3).

Figure 2

Figure 2: Overview of a OneNote Notebook

Figure 3

Figure 3: Close up of OneNote Conversation

Thus, using OneNote as a tool changes the nature of the discussion from “prompt to response” to “prompt to response to response:” to “student created questions to response to a student to student conversation.” By changing the format of the conversation from a purely print-based vertical format students are able to have asynchronous conversations on-line that more closely mirror a live discussion.  The discussion can be viewed with or without viewing the names of the participants.  The figure above is an example of how OneNote works with students’ creation of questions.

The figures are an overview of an extended conversation.  Figure 1 demonstrates students posting their initial pre-reading questions on the left while different group members discuss the questions to the right.  As the respond to each other’s posts, they indent or move their statements or questions further to the right.  The bottom left of figure 1 is a synthesis of the discussion by the discussion leader.

Figure 2 is also a look into a pre-reading discussion around questions.  You will notice how students identify questions that they like to the right of the questions posted.  Please will also notice that there are two audio posts.  The audio posts have student’s thoughts on the questions.  The content is similar to the post the written responses.  In both figures, you will notice that as students work to finalize their questions for reading they are discussing why they believe different questions will support them during reading with each student going back and forth at least two times before the leader uses the thoughts to develop final questions.

The figures of the discussions are just a glimpse of how careful design of both the discussion opportunity and the thoughtful selection of the tool can create a non-linear asynchronous discussion that supports students to develop a careful reading of the assigned text while engaging in a discussion that is interactive and multimodal.

Microsoft OneNote offers a way to build student engagement and involvement without some of the pitfalls of traditional on-line discussions threads. Since the discussions are not limited by chronological and/or hierarchical structure, students are able to think through their responses while providing a structure that promotes connecting ideas thus avoiding one of the negative issues of threaded discussions, inefficiency in promoting interactive dialogues due to structure (Thomas, 2002).  The move away from traditional threaded discussions allows students to post in a structure that follows more of a natural progression, such as one that would occur in a face-to-face class.

References

Akyol, Z., & Garrison, D. R. (2011). Assessing metacognition in an online community of inquiry. The Internet and Higher Education, 14(3), 183-190.

Althaus, S. L. (1997). Computer-mediated communication in the university classroom: An experiment with online discussions. Communication Education, 46, 158–174.

Garrison, D. R. (2003). Cognitive presence for effective asynchronous online learning: The role of reflective inquiry, self-direction and metacognition. Elements of quality online education: Practice and direction, 4, 47-58.

Kane, S. (2011). Literacy & Learning in the Content Areas, 3rd Ed. Scottsdale, AZ: Holcomb Hathaway.

Larkin-Hein, T. (2001). On-line discussions: A key to enhancing student motivation and understanding? 31st ASEE/IEEE Frontiers in Education Conference, Reno, NV. http://fie.engrng.pitt.edu/fie2001/papers/1121.pdf.

Maddix, M. (2012). Generating and facilitating effective online learning through discussion. Christian Education Journal 9(2), 372-385.

Paris, S. G., & Winograd, P. (1990). How metacognition can promote academic learning and instruction. Dimensions of thinking and cognitive instruction, 1, 15-51.

Sun, Y. & Gao, F. (2016) Comparing the use of a social annotation tool and a threaded discussion forum to support online discussions. Internet and Higher Education, 32, 72–79.

Thomas, M. J. W. (2002). Learning within incoherent structures: The space of online discussion forums. Journal of Computer Assisted Learning, 18, 351–366.

Wood, K. & Bliss, K. (2016). Facilitating successful online discussions. The Journal of Effective Teaching, 16, (2), 76-92

About the Blogger:

Nance Wilson

Nance Wilson

Nance S. Wilson, Ph.D., is Associate Professor, Chair of the Literacy Department, and Coordinator of Jewish Studies at SUNY Cortland. She can be reached at nance.wilson@cortland.edu

Literacy Instruction in a Brave New World: A themed issue from Kappan

Phi Delta Kappan has just published a themed issue on “Literacy Instruction in a Brave New World” (November, 2014, volume 96, No. 3). For a short time period, you may view and download all of the articles online, for free.

http://pdk.sagepub.com/content/current

magazine cover shows child reading on a tablet

Literacy Instruction in a Brave New World

As literacy and technology expert Mike McKenna states in the opening to his article,

“Technology integration into language arts instruction has been slow and tentative, even as information technologies have evolved with frightening speed. Today’s teachers need to be aware of several extant and unchanging realities: Technology is now indispensable to literacy development; reading with technology requires new skills and strategies; technology can support struggling students; technology can transform writing; technology offers a means of motivating students; and waiting for research is a losing strategy.”

We have a lot to learn, a lot to accomplish, and we need to pick up the pace! I found this issue both practically valuable and thought provoking.

Please go to the Kappan website http://pdk.sagepub.com/ and search for the current November 2014 issue, or click on  http://pdk.sagepub.com/content/current to go directly to the table of contents. I’ve listed the table of contents below (note that Jill has a piece on online inquiry and I have a piece on eText and eBooks). Enjoy!

Literacy Instruction in a Brave New World – Table of Contents

Michael C. McKenna, Literacy instruction in the brave new world of technology

Joan Richardson, Maryanne Wolf: Balance technology and deep reading to create biliterate children

Christopher Harris, Fact or fiction? Libraries can thrive in the Digital Age

Samina Hadi-Tabassum, Can computers make the grade in writing exams?

Melody Zoch, Brooke Langston-DeMott, and Melissa Adams-Budde, Creating digital authors

Bridget Dalton, E-text and e-books are changing literacy landscape

Diane Carver Sekeres, Julie Coiro, Jill Castek, and Lizabeth A. Guzniczak. Wondering + online inquiry = learning

Gail Lynn Goldberg, One thousand words, plus a few more, is just right

Kristin Conradi, Tapping technology’s potential to motivate readers

Using Technology to Improve Reading and Learning

Book  cover of Using Technology to Improve Reading and Learning

When friends write a book, of course, you’re excited for them and can’t wait to read it.  What’s even more wonderful is when you read the book and it’s terrific – one that you know you will use in your own teaching. Using Technology to Improve Reading and Learning by Colin Harrison and fellow Literacy Beat bloggers Bernadette Dwyer and Jill Castek is just such a book.

I found this book to be exceptionally useful for many reasons, but I will highlight just two of those reasons here.

First, Colin, Bernadette, and Jill are not only experts in technology and new media; they are first and foremost experts in literacy instruction. They have taught children how to become engaged and successful readers and writers, and they have taught and collaborated with teachers on effective literacy instruction and technology over many years. Their deep knowledge and on-the-ground experiences with children and teachers is demonstrated in every chapter. They speak directly to teachers, acknowledging the realities of today’s schools and the pressure to achieve high academic standards with all students, while offering a vision and concrete classroom examples to inspire us to embrace the challenge.

Second, this book provides a comprehensive blueprint for integrating technology so that children are more successful with print-based reading and writing AND are developing the new literacies of reading, learning, and communicating with eBooks and on the Internet. Bernadette, Jill and Colin complement a chapter on reading eBooks and digital text with two chapters on Internet inquiry – one focusing on the search process and the other focusing on how to compose and communicate through multimodal products. These are areas where we need to make tremendous progress if we are going to prepare our students for a future world that will be more multimodal, more networked, and more dependent on individuals who are creative, strategic, and collaborative.

I’ve copied the table of contents below. You will see that this book offers teachers multiple pathways for moving forward on their own journeys of technology and literacy integration. Enjoy (I know I will)!

Table of Contents

  1. Using technology to make the teaching of literacy more exciting
  2. Strategies for capitalizing on what students already know
  3. Strategies for using digital tools to support literacy development
  4. Strategies for using eReaders and digital books to expand the reading experience
  5. Strategies for teaching the information-seeking cycle: The process stage of searching for information on the Internet
  6. Strategies for teaching the information-seeking cycle: The product stage of searching for information on the Internet
  7. Strategies for encouraging peer collaboration and cooperative learning
  8. Strategies for building communities of writers
  9. Strategies for building teachers’ capacity to make the most of new technologies

Apps a Plenty, Apps Galore! Starting on an iPad App Adventure

I’m on the literacy faculty at the University of Colorado-Boulder.  Although I try to integrate technology into my teaching in thoughtful and creative ways, I don’t always succeed.  Typically, it’s due to lack of time, or the right hardware or software access, or the right know-how!  This month, the School of Education received a generous gift of 30 iPads to use in our Literacy Classroom.  My immediate reaction:  What a fabulous opportunity to explore how the undergraduate reading methods class and I will use this gift over the remainder of the semester.  So, in that spirit, my next few posts will focus on how it’s going, what I’m learning, and what I wish I never had to learn!

A General Web Resource on Teaching with iPads

Way back when (yes, all the way back to the 1990’s), I used to consult Kathy Schrock’s website when I had a technology question.  I was delighted to find that she has a special website dedicated to all things iPad related!  Whether you’re a beginner or novice user of iPads, there are things to learn from Kathy and the many educators who contribute resources and teaching strategies to this site.

http://www.ipads4teaching.net/

screenshot of Kathy Schrock's website on teaching with iPads

iPad Posts from Dana Grisham

And, for those of you working with young children, visit the recent posts from Dana Grisham about developing emergent literacy with iPad apps.

  • Recommended pre-school apps for literacy learning

https://literacybeat.com/2014/02/27/recommended-preschool-apps-for-literacy-learning/

  •  Goodnight, iPad!

https://literacybeat.com/2013/09/18/goodnight-ipad/

Essential Apps for our CU- Boulder Literacy Classroom

As soon as we got word that we were going to be receiving the iPads, I immediately began to think about “essential apps”.  Our budget was limited, so I knew I needed to be strategic in what we purchased (in a later post I’ll focus on free apps).

#1:  A Drawing App

To begin, I knew I wanted a drawing program to support multimodal composition. I knew that we would be able to use it for responding to literature with color, drawing, photos, and images remixes, as well as creating illustrations for the students’ original picture books and trying out the  ‘sketch to stretch’ reading comprehension strategy. I also wanted the drawing program to be one that could be used in elementary schools, since my goal was that the CU future teachers would first compose with the drawing tool themselves, and then apply it to teaching children.  After reviewing multiple programs and getting advice from teachers in our masters’ program, I selected Drawing Pad ($1.99).   It’s simple and intuitive, yet allows you to create some pretty amazing images fairly quickly!

Drawing Pad ($1.99)

https://itunes.apple.com/us/app/drawing-pad/id358207332?mt=8

Drawing Pad App logo

screenshot of Drawing Pad tools

#2:  A Book Creator App

My  second priority was to purchase Book Creator, another composing App that packs a lot of communication potential into a simple, yet powerful tool.   I knew my good friend and colleague, Debby Rowe from Vanderbilt University, was successfully using Book Creator with pre-school and kindergarten children.  Further, some Colorado elementary school teachers in our masters program tried it out in their classrooms last semester and gave it a favorable rating.  Based on these positive reviews and my own experimentation with a free version, I decided that Book Creator would be a good match for our needs.   It was more expensive — $4.99 – but it seemed worth it not to experience glitches that sometimes occur with a free version.

Book Creator ($4.99)

https://itunes.apple.com/us/app/book-creator-for-ipad/id442378070?mt=8

Book Creator logo

screen shot of Book Creator composing tool

Taking That First Step

So, with 30 iPads and two essential Apps, I am ready to begin the adventure of Ipad and App integration into my reading methods course.  I’ll let you know how it’s going next month.  I should warn you that I am a PC person.  I love my Apple smart phone, but am not nearly as fluent working on a MAC or an IPad as I am on a PC.  So, the learning curve will be steep and I’m feeling some anxiety about the process.  Ready, set, go!

If you have advice, suggested Apps, please post a response.  I thank you in advance,  Bridget.

Pecha Kucha, a Presentation Format with Many Possibilities

By guest posters W. Ian O’Byrne & Sue Ringler Pet, & regular blogger Thomas DeVere Wolsey

The nature of literacy is rapidly evolving and these changes demand an expanded view of “text” to include visual, digital and other multimodal formats (Rose & Meyer, 2002; New London Group, 2000; Alvermann, 2002). A richer and more complex definition of literacy requires a complex theoretical framing of the “multiple realities” that exist between educational research and practice (Labbo & Reinking, 1999).  Several colleagues* decided to experiment with the pecha kucha presentation style at a session of the Literacy Research Association, December 5th, 2013. What they learned from the session and their ideas for PK-12 classrooms and teacher preparation coursework is summarized in this post of Literacy Beat. Our pecha kucha session used multiple methods united by similar perspectives to investigate shifts in the space and stuff (Lankshear & Knobel, 2006) of learning.

Evolving pedagogical models for new literacies and emerging technologies hold “explosive possibilities” (Barab & Kirshner, 2001) for reading and writing spaces. Specifically, these studies examine literacies as cutting across chronotopes of time and space (Bakhtin, 1937) and evolving into “communities of inquiry” in which participants require new knowledge and identities (Gee, 2005).

Since the technological advances documented in these studies drove much of the change that we see in information and communication, researchers and educators attempted to answer the important question:  How can the use of new and digital literacies in instruction enable “explosive possibilities” for meaning-making and identity construction? These studies examined literacies and digital texts while documenting perceived changes in social practice through the lens of teachers and students as agents of change.

What is Pecha Kucha?

Pecha kucha, Japanese for the sound of conversation, is a presentation method in which 20 slides are shown for 20 seconds each (6 minutes and 40 seconds in total). The format utilizes images more than words, keeps presentations concise and fast-paced, powers multiple-speaker events, keeps the interest level up, and gives more people the chance to show. Would you like to hear several Japanese speakers pronounce the term? Click here.

Teachers and Students use Pecha Kucha

Pecha kucha is well-suited for the age of the Common Core and other rigorous standards.  The Common Core calls for students to evaluate information from diverse sources, present information in an appropriate style, and make strategic use of digital media. Further, the pecha kucha style requires student presenters to be concise and choose their words and images wisely and well. Students might present pecha kucha via webcast or video (think, YouTube or Vimeo) so that parents and other community members can participate. They may work in small groups around selected topics. Who says every presentation has to be made to the entire class, anyway?

Teacher Educators and Teacher Candidates use Pecha Kucha

The IRA standards for Literacy Professionals call for teacher candidates to employ traditional print, digital, and online resources to “meet the needs of diverse students” and “prepare learners for literacy tasks of the 21st century.” Arguably positioned in one of the most influential roles with regard to the explosive possibilities of digital literacies in PK-12 education, teacher educators must continually model well-considered integration of digital tools in university classrooms. Within the context of a disciplinary literacy course, for instance, professors may choose the pecha kucha platform for in-class presentations in lieu of the tired Powerpoint® platform, especially in cases where visuals are preferable to print text, to effectively encapsulate and express important concepts, terms, or ideas. In this setting, pecha kucha presentations can be posted and revisited on Blackboard or similar course platforms for review. Professors may also invite undergraduate and graduate students to learn and employ pecha kucha to explore and represent basic literacy concepts with digital images and metaphors — and teach them to classmates. Teaching and/learning such “basic” literacy terms (e.g., phonemic awareness, syntax, semantics) through a multimodal digital platform (pecha kucha) may lead to enriched understandings of the ways in which reading involves the coordination of multiple systems including traditional “components” theory of teaching reading instruction as well as sociocultural theories of literacy acquisition.

How to Create Pecha Kucha: Resources and More

What are the steps to creating a pecha kucha presentation?

  • This website lists presentation steps in pecha kucha format and a template is available there, as well.
  • A few tips for beginners might be helpful to teachers who want to coach their students and minimize frustration.
  • Richard Edwards suggests that pecha kucha can be easily adapted to two-person teams; that is, a 20 slide X 20 second presentation by one student can become a 10 slide X 20 second presentation by two students. He also staggers presentations over class sessions such that no one class session is devoted to a long series of pecha kucha presentations, which, like traditional presentations, can be quite tiring for the audience.
  • Because pecha kucha is image intensive, it is very important that students learn the basic principles of Fair Use and apply them. This post from an earlier LiteracyBeat column may be a good start.  Learn more about Creative Commons and how it works to give students and other users the tools to share and use the creative work of others.

Similar to pecha kucha, Ignite presentations include 20 slides but they advance at the rate of 15 seconds each (total of five minutes). Some fairly good information about both ignite and pecha kucha are available from Trinity Valley Schools (opens as a PDF).

Assessing Pecha Kucha

Of course, any presentation in a classroom is an opportunity to learn and a chance to demonstrate what has been learned.  Assessment includes the possibility of feedback about content knowledge, processes leading to learning, and presentation, speaking, and listening proficiency appropriate to the grade level. Mr. Holliday designed this rubric as a means of assessing and providing feedback on the pecha kucha format. This university rubric from iRubric takes into account content knowledge  and this  one, by Danny, is designed with the junior high or middle school audience in mind. Educator Jeff Utecht suggests that participants rate the pecha kucha presentation using a form in Google Docs for quick analysis and feedback. Also on the blog post are additional ideas and a rationale for using pecha kucha.

Typical assessments measure and provide feedback as to how the presenter met the pecha kucha criteria (including 20 slides X 20 seconds each, 6 minutes 40 seconds total), concision, design, and cohesion, as well as content. Choo (2010) suggests that makers and composers of digital texts consider the following:

•           How do words function to “relay” or contribute to the meaning of an image?

•           Where will the image be placed in relation to the words and why?

•           How much of the frame-space will the image occupy, compared to the words?

•           Is the focal point of the text on the image or on its words, and why? (p. 172)

Here is one attempt at pecha kucha by DeVere recreated from the December 2013 presentation at Literacy Research Association. It is not quite perfect (you will notice it is longer than the allotted time!), I am sure you’ll agree, but do play the video and let us know what you see.

What have you done in your PK-12 or university classroom with pecha kucha?

*Presenters at the Literacy Research Association, Dallas, TX: Kelly Chandler-Olcott (Chair), Stergios Botzakis (Discussant), Sue Ringler Pet, Greg McVerry, Junko Yukota with William Teale, Joan A. Rhodes, Katina Zammit, William Ian O’Byrne, Thomas DeVere Wolsey

Guest posters:

W. Ian O’Byrne is an assistant professor of educational technologies at the University of New Haven. Read his blog post on the topic of pecha kucha here.

Sue Ringler-Pet works at Iona College, and you can read more about her here.

References:

Alvermann, D.E. (2002). Adolescents and literacies in a digital world. New York: Peter Lang.

Barab, S.A., & Kirshner, D. (2001). Guest editors’ introduction: Rethinking methodology in the learning sciences. The Journal of the Learning Sciences,10(1-2), 5-15.

Bolter, J.D. (1991). Writing space: The computer, hypertext, and the history of writing. Mahwah, NJ: Lawrence Erlbaum Associates.

Choo, S.S. (2010). Writing through visual acts of reading: Incorporating visual aesthetics in integrated writing and reading tasks. High School Journal, 93(4), 166-176.

Gee, J. (2005). Semiotic social spaces and affinity spaces. In D. Barton & K. Tusting (Eds.). Beyond communities of practice. Cambridge: Cambridge University Press.

Labbo, L. & Reinking, D. (1999). Negotiating the multiple realities of technology in literacy research and instruction. Reading Research Quarterly, 34(4), 478-492. doi:    10.1598/RRQ.34.4.5

Lankshear, C. and Knobel, M. (2006). New Literacies: Everyday Practices and Classroom Learning. 2nd ed. Maidenhead & New York: Open University Press.

The New London Group. (1996). A pedagogy of multiliteracies: Designing social futures. Harvard Educational Review, 66(1), 60–92.

Rose, D. H., & Meyer, A. (2002). Teaching every student in the digital age: Universal design for learning. Alexandria, VA: ASCD. Retrieved from http://www.cast.org/teachingeverystudent/ideas/tes/

Vocabulary Video Contest from the New York Times’ Learning Network

I’ve been exploring Vocab Vids as an engaging, multimodal approach to vocabulary learning.  I’ve seen how students from third to twelfth grade, as well as undergraduate and graduate students,  invest themselves in exploring word meaning, brainstorming skit ideas, and then shooting a video to express the word.

Image

I was delighted to receive a message last week that led me to the New York Times Learning Network’s blog featuring their Vocabulary Video contest (hurry, the contest ends, Dec. 5!).  In celebration of nearing publication of 1000 words in their word of the day blog, they have invited students from ages 13-10 to create and upload 15 second videos illustrating one of the featured daily words.

Even if you don’t enter the contest, I recommend that you check out the Learning Network’s  post to learn more about vocabulary videos.  They feature several teacher blogs and online references that are likely to be helpful in supporting vocabulary instruction.  I was happy to see that they also featured my Literacy Beat post, Vocab Vids.

Image
If your students post their vocab vids, please let me know.  I would love to see them and hear about your process.

YouSeeU: A New Multimodal Tool for Teacher Educators

This year, for the second time, I taught a supervised reading course for California State University, Fresno, as part of their Reading/Language Arts Added Authorization (RLAA) for practicing teachers who want professional development focused on reading.

The course, LEE230, requires that teachers learn assessment, diagnosis, and intervention for struggling readers by tutoring a small group of students (or a single tutee) with supervision from the university. In the past, such a course would have been taught in a reading clinic on campus or a supervisor would have visited the teachers in their classrooms. But, as we have noted from previous experience (please see my Literacy Beat post from one year ago at https://literacybeat.com/?s=Qik), actually being present to supervise teaching is not necessary. As I noted in June 2012, “This class was taught in a 5-week time frame, so the pace was intense, and the teachers and I never met face-to-face. Teachers were required to spend 20 hours of tutoring a small group of students. Instead of coming to a clinic, teachers could select the small group from their own classrooms, from that of another teacher, or volunteer in a classroom if they were not currently teaching. All of these scenarios played out during the course.” All of this was true this spring, too, although Dr. Glenn DeVoogd arranged for a new tool to be used, called YouSeeU.

My introduction to YouSeeu (http://www.youseeu.com/) was a personally conducted orientation to the system by Josh Kamrath in a webinar. Josh was also available for problem solving (very few!) during the class. The home page provides information about the system, which—like QIK—was a free trial for this experimental course. The screen capture below gives you an idea of the website and there are several videos on the affordances of the website. At Fresno State, in a graduate level course, I used a very simple aspect of the program.

Image

For my purposes, the teachers needed to provide 5-15 minute video segments of their tutoring accompanied by lesson plans and reflections on the process. My job was to analyze the lesson plans (which followed a prescribed format), then watch the video segment and provide feedback to the teacher. The entry portal for the course looked like this:

Image

Once you clicked on the class, the site took you to another page that provides you with a view of the video and a list of the students and the videos that they have submitted for review. Most interesting is the opportunity of commenting on the videos as they play. The comments are synchronized with the video, so that the teacher can view the video and see the comments as they arise in response to the teaching.

Image

 The following screen shot (with names removed) gives you an idea of what the scoring looked like, with options such as archiving. The student can set the parameters for who can view their video. All were originally set so that only I, as instructor, could view them. If I were to do this again, I think I would promote more peer review of the teaching, since teachers learn so much from each other.

Image

 Finally, I asked for and received permission from one of the teachers to share a video with my comments on it for this blog.   The embedding of this video is done below:

Tutoring a Small Group YouSeeU

I hope you enjoy reading about YouSeeU and seeing it in action. The Chief Education Officer, Jeff Lewis, was most cooperative and concerned about confidentiality (very important to them). YouSeeU is a commercial endeavor and the cost is.

UDL Studio: Deepening response to literature

UDL Studio, a free digital tool (funded largely by the Carnegie foundation) has recently been released by CAST. UDL studio is underpinned by the principles of Universal Design for Learning . UDL Studio  joins other successful digital tools created by CAST. See for example my blog post on LEA Meets Book Builder. UDL Studio enables anyone to create media-rich resources, to actively engage and motivate students, and to respond flexibly to the needs of each learner; thereby ensuring quality and equality in access to learning for all.

UDL Studio offers templates to scaffold you or your students as you create content using multimodal elements, such as text, image¸ video, audio, and animation. You can explore the project library to view previous projects created by UDL studio users.
For example, Katherine Cooper has created a project around Charles Dickens’ classic tale A Christmas Carol. In the screen shot you can see links to audio recording related to character study. Students can also record their prior knowledge of the story through multiple modalities, such as writing, recording, drawing, or uploading a file attachment.

Katherine Cooper

Katherine Cooper

Meanwhile, Matthew Puma has created a resource to support his students while reading SOS Titanic by Eve Bunting. Students can explore historical information relating to the Titanic; inner feelings of the characters; and actions and events within the book. The screen shot below relates to a mind map of themes in the Titanic.

mind map SOS Titanic

My wonderful, final year, elective student teachers have begun to explore the possibilities presented by UDL Studio to encourage immersion in, involvement with, and interpretation of literature (Dwyer & Larson, 2013). We have begun a project around The Boy in the Striped Pyjamas/Pajamas by John Boyne. Our aim is to deepen engagement with the text through close reading to explore the structure of the text; the perspectives of the characters; the use of vocabulary; and historical perspectives relating to the text.

The Boy in the Striped Pyjamas

We really like the tips and resources page which asks you to reflect carefully on how the use of the digital tool enhances children’s understanding of text; enriches the reading experience; and represents information in an engaging manner. The plethora of free digital tools include:

Recording and editing software
Audacity: http://audacity.sourceforge.net/
Free Sound Editor: http://www.free-sound-editor.com/
Audio Pal: http://www.audiopal.com/index.html

Video search engines and editing software
• Blinkx Video Search Engine: http://www.blinkx.com/
• Truveo Video Search: http://www.truveo.com/
• Video editing http://www.stroome.com/

Sources for images
• Pics4Learning: http://pics.tech4learning.com
• Creative Commons image search: http://search.creativecommons.org/
• Free Photos: http://www.freeimages.co.uk

Animation tools
• Gifninja: http://www.gifninja.com/
• Picasion: http://picasion.com/
• GoAnimate: http://goanimate.com/

Reference
Dwyer, B. & Larson, L. (2013). The writer in the reader: Building communities of response in digital environments. In Kristine E. Pytash & Richard E. Ferdig (Eds.). Exploring Technology for Writing and Writing Instruction. US: IGI Global

Insights From A Service Learning Project: Creating Digital Projects with iPads to Encourage Safe Driving

A new post by Jill Castek

Melanie Swandby, a 7th grade teacher at Lighthouse Community Charter School in Oakland, CA was conducting a service learning project geared toward promoting safe driving habits.  Melanie was happy to explore digital content creation with her students, extending her original vision for the project with the goal of producing clear and coherent writing in which the development, organization, and style were appropriate to task, purpose, and audience (CCSS Initiative, 2010). She invited Heather Cotanch and I to explore the use of iPads to create digital products that would resonate with teens and the wider community. We were excited to witness the content creation process which included elements of collaboration, experimentation, and flexible grouping to support peer facilited tech-help.

Why Digital Content Creation?

Digital tools are transforming what it means to be literate in today’s world. In the past, it may have been that decoding words on a page was enough to consider a student literate. Today, we live in a world with ever increasing importance on digital tools and technologies as a means of accessing and sharing ideas.  Students need to become facile with the full range of communicative tools, modes (oral and written), and media. Having the ability to comprehend, critically respond to, and collaboratively compose multimodal texts will play a central role in our students’ success in a digital information age (Partnership for 21st Century Skills, 2007; IRA, 2009).

Setting the Context for Digital Content Creation

Melanie’s class  worked to actively create projects that resonated with their intended audience without needing elaborate direction with the use of iPad apps. First, we provided a basic overview of the affordances of three digital composition apps (ShowMe www.showme.com, VoiceThread www.voicethread.com, and iMovie for the iPad www.apple.com/ipad/from-the-app-store/apps-by-apple/imovie.html – these three content creation apps were chosen because they allow users to integrate still images, include a drawing tool, and have the capacity to include voice and sound effects).  Then, we shared an example product from each app and students were off and running. They soon discovered many features of the apps themselves as they worked.  This new knowledge was distributed throughout the classroom as peer support and flexible grouping was implemented.

Students completed digital products can be viewed from their student-created website Hitting The Road Safe http://hittingtheroadsafe.webs.com and at Safe Driving VoiceThreads https://sites.google.com/site/swandby/safe-driving-voicethreads and also ShowMe http://www.showme.com under the username jill.castek@gmail.com and password safedriving.

iMovie. While using iMovie, students worked in groups and took on different roles such as creators, actors, and editors. Collaboration came in many forms, for example, some students did not want to appear on camera, but were willing to write a script and film a partner.

 Other groups took turns incorporating found pictures and discussing sequencing to communicate a strong, clear message. Because of the ease of use and multiple options within the iMovie app, the editing process can become never ending.  To support a more skilled use of the app, we pointed students toward a YouTube editing tutorial. Students who found themselves with extra time added captions or experimented with the background music offered within the tool. These “extras” gave the movies a professional feel while extending the students’ knowledge of the technology and supportive the processes of reflection and revision.  While the iMovie app proved easy for students to navigate, explore, and edit, teachers would be well advised to guide students through ample planning of their project during their first few interactions with this tool.

ShowMe.  Possibly the greatest successes were achieved with students use of the ShowMe app. Like iMovie, it produces a video, but its affordances allowed students to deliver the most complete, succinct messages of all three tools (student work is available at showme.com under the username jill.castek@gmail.com and password safedriving). During the showcase at the end of the project, the student audience commented on the ability for students to appropriate humor about a serious topic to be showcased. This was achieved through the use of voice, drawing, and integration of selected images. This app has limitations in the amount of media that can be uploaded and may have prompted the students to choose wisely from their options, making the message clear rather than being lost in elaborate visuals.

From the first introduction of this app, the students demonstrated an eagerness to peruse the tools and begin incorporating images, drawing and voice together rather than compiling images for a later use (a pattern we noticed with other tools). Even after several projects were lost due to glitches with the system, students simply started over learning from their mistakes, making strategic use of the drafting process, and integrating their new knowledge into final products.

VoiceThread.  This tool offered the most structured means of conveying ideas and the students took to the tool readily.  Once slides containing images were created, they could be moved around as the message was drafted and revised. Once sequenced, students could voice over the visuals to communicate their message.  Completed VoiceThreads can be viewed at https://sites.google.com/site/swandby/safe-driving-voicethreads.

Students created multiple drafts of their VoiceThread project and practiced their voiceover several times to ensure the tone and quality of the message was spot on. Unfortunately, the VoiceThread interface selectively saved some of voiceovers, which required students to re-create their projects more than once.  However, this redrafting wasn’t something students balked at and the message conveyed in each subsequent draft was more extensive, and richer in vocabulary and details.  The limits of the technology were not discouraging, but rather a valuable introduction to the process of creating technology-based multimodal products.

What Did We Learn?

Students completed projects included a logical sequence but also incorporate personal touches through the use of music, voice, sound effects, and pictures remixed and used in creative ways.  By including a specific focus on intended audience, Melanie’s students were readily able to form and frame a persuasive message. For example, students who chose parents of teen drivers as the target audience drew on experiences from their out-of-school lives and combined them with statistics from a school-based text. This resulted in charts and graphs representing percentages, an articulated message free from teenage jargon and pictures free from gore (as opposed to an increased shock value to presentations geared toward teen drivers).

Collaboration is key. Collaboration was widely fostered by encouraging students to turn to each other as resources and to help each other figure out how to accomplish their goals. For example, one group of students was using the ShowMe app and wanted include text in their presentation (there is no feature in which students can type using a keyboard). Students offered each other a workaround demonstrating the use the notepad feature and taking a screenshot to import it into the project. Other students offered another option and hand-wrote text on a piece of paper in bold marker and took a picture to import into the project.  Still others shared how to use their finger to write the message manually. As was the case here, students often knew what feature that they wanted and found innovative ways to use the app to meet their goals. These observations reinforce the idea that step-by-step instruction by a teacher is not necessary before students use new apps.  We discovered taking the time was not worthwhile and may, in fact, detracted from the collaborative and discovery nature of the work and curtail digital competence.

Time for experimentation is vital.  We recognized at the outset of the project thatstudents were eager to learn how to use the apps offered to them in the act of content creation.  While our instincts told us to model for students, it became increasing clear to us that experimentation with the apps supported student learning much more efficiently.  It became evidence that when technology is being used, a new role for the teacher is created.  She is no longer the “sage on the stage” and must be more comfortable circulating to support implementation by being the “guide on the side.”

Creativity and humor were strategically to convey ideas. As students created their projects, they infused persuasiveness through their use of creativity and humor.  Creativity extended well beyond being able to draw well.  When asked to reflect on the project, students reported being more engaged in the digital creation process, than the paper and pencil task (even though they needed to develop digital skills quickly to use the tools).  They also enjoyed viewing the projects created by other classmates (even though they were very familiar with the content contained within them).  Students created multiple digital drafts of their project (and were glad to do so).  They appeared to use the multiple drafts to improve the project iteratively.  If a student wanted to revise or rethink a portion of the digital creation, the opportunity to do this was manageable as opposed to the static poster version from which the students began. As pairs worked collaboratively, new ideas for improvement were shared amongst partners, which led to subsequent (improved) drafts. Even though students might have stumbled through the first couple of tries, they got better at it each time. Persistence was key!

Student Insights

Through the implementation of this project, we aimed to test a process by which students could create digital products (including drawings, images, and voice)  that could be shared with a school and community audience.  At the end of the project, students were asked to share what was different about digital content creation. One student remarked, “It’s more creative and more fun to play around with. It’s more exciting. You can put your voice into it and you can make it more fun.” This student aptly points out that digital projects are flexible.  If a student wants to revise a portion of the digital creation, this is manageable. In contrast, changes on a static page can be messy or difficult and offer little room for rethinking of an idea. Another student shared, “You can use funny pictures but you can still have a serious message.”  This learner points out that students could develop and incorporate their own multifaceted literacies. Although humor was never mentioned as a component of the project, students freely infused their personalities through media to reach their intended audiences on a level that demonstrated a high degree of literacy skill. A third student pointed out, “It’s a lot faster than when we usually do projects, you can write in different ways like voicing your message.”

Communicating with a Real Audience

In viewing the final projects,  the audience (made up of members of the school and community) found the addition of suspenseful music, images, and the story-lines conveyed through multiple modes generated a tangible impact that was memorable. Witnessing the audience’s reaction interaction was one way that the students owned their success. It was clear that all students felt accomplished and through the act of digital content creation, they became more skilled in the digital literacies that are a vital  part of our 21st century world.

References

Common Core State Standards Initiative. 2010. Common Core State Standards for English Language Arts and Literacy in History/Social Studies, Science, and Technical Subjects. Available at http://www.corestandards.org/assets/CCSSI_ELA%20Standards.pdf

International Reading Association. (2009). Integrating literacy and technology in the curriculum: A position statement.  Newark, DE: International Reading Association.

Partnership for 21st Century Skills. (2007). Learning for the 21st century. Available at http://www.21stcenturyskills.org/reports/learning.asp

Expressive Learning: Encouraging Students’ Multimodal Expression to Enhance Content Learning

A New Post by Jill Castek

I’ve been exploring the use of iPads to support literacy and science learning in middle school classrooms throughout the school year.  One of the most powerful ways I’ve found to help students make deep and lasting connections to content learning is to design meaningful classroom projects that engage students in working collaboratively to convey ideas  using digital tools that support multimodal expression.  As student design and create, they purposefully use key vocabulary and integrate examples that illustrate their thinking.  Student projects can be celebrated, showcased, and shared with an authentic audience made up of peers, teachers, and the wider community.  They’re also a great way to formatively assess student learning.

Students work collaboratively on digital projects to support content learning.

The Power of Student Collaboration

By working collaboratively, students are challenged to think through the important processes of choosing a focus, reflecting on what they know and how to represent it, and designing an action plan. As peers enact their plans, they critique and rework their representations iteratively until they’re satisfied their work has achieved the intended goal.

Working with iPads has provided students easy-to-use apps that support drawing and annotating images, inserting photographs, and creating voiceover capabilities. These features make it possible for students to express their understanding in multiple ways through multiple means, an aspect central to Universal Design for Learning (UDL). This post focuses on two examples of digital collaborative projects and the apps that supported their creation.

ShowMe for the iPad

ShowMe (see http://itunes.apple.com/us/app/showme-interactive-whiteboard/id445066279?mt=8) is an FREE iPad app that allows users to use images, drawing tools, and voiceover to communicate ideas.  Once a project is created, it can be shared on the ShowMe website http://www.showme.com/ or embedded into any digital forum (blog, wiki, website, etc.)  While this tool is often used by teachers in a receptive way, for example to deliver short lessons or tutorials to students,  I was interested in getting ShowMe into students’ hands so they could use its features creatively to express their understanding of concepts and ideas (thus enhancing and extending content they had learned).

Using ShowMe to Summarize Important Ideas from Reading

Linda Wilhelm’s 7th graders at Valley View Middle School in Pleasant Hill, CA were studying genetics in their Science class.  ShowMe was used to support an enhanced jigsaw activity where students created were expected to weave key ideas from their textbook and web-based reading into a short project that expressed their understanding of the content and provided examples. There were several subtopics; and pairs were assigned one of four themes to convey:  1) Some genes are dominant while others are recessive, 2) Mendelian laws apply to human beings, 3) All cells arise from pre-existing cells through the process of cell-division, 4) Sex cells have one set of chromosomes, body cells have two.

Students were shown a sample ShowMe project created by the teacher to give a sense of what was possible with ShowMe (which included importing images, drawing features, stop and start capabilities, and voiceover).  Then, a project rubric was distributed and discussed with students to convey expectations for the project.  Finally, students were provided time to plan and record their ShowMe projects.

Although storyboarding on paper was modeled and provided as an option, students preferred to draft their ideas directly into ShowMe.  As they drafted, they created multiple takes that were played back and evaluated by students iteratively.  Critiquing and revising with the ShowMe tool was immediate and satisfying for students and sparked careful re-reading and reflection on the texts provided.  It also sparked discussion on important aspects of visual literacy as students carefully thought through what images would best help illustrate their main points.  Throughout, collaboration was evident and a vital part of the digital content creation process.

ShowMe Student Examples

Click on the URLs provided and the ShowMe projects will open in a new window:

Using iMovie for the iPad to Construct, Explain, and Show Understanding

Leon Young’s 6th graders at Realm Charter School in Berkeley, CA were studying plate boundaries during a plate tectonics unit.  They designed and built their own scientific models to show the characteristics of plate boundaries in different locations around the world.   Students were then invited to create a short video using iMovie to showcase and explain their model to their classmates and school community.

Pairs of students worked together to think through how to convey science content through their video productions.  As they discussed shot selection, they showed a keen awareness of audience and purpose and found meaningful ways to explain scientific terms and concepts for those unfamiliar with the content.  As was the case with the ShowMe projects, students created multiple takes and revised iteratively as they reflected on word choice and overall flow of ideas.  The result was a strong and solid representation of what they learned that showcased both creativity and collaboration.

iMovie Student Example

Using Digital Tools to Support Multimodal Expression

When asked about the making these digital products students said the work was “fun, active, and creative.”  Not only did these projects support engagement with content, they also supported the development of vital 21st century literacies.  Students were able to showcase their learning in ways that involved multimodal expression which requires higher level thinking skills such as synthesis, evaluation, and critique (and are also central to the Common Core State Standards).

If you’re looking for a step-by-step guide for the use of ShowMe, iMovie, or other iPad apps that support literacy and content learning, click on the Step-by-step Guide to iPad apps and HandoutForIRAPreCon.  These presentation materials are from the IRA session that Jen Tilson and I delivered in Chicago, IL in May 2012.  Other speakers’ session materials, including Bernadette Dwyer’s handouts, can be accessed from the IRA TILE-Sig website at http://tilesig.wikispaces.com/Conference2

Add a comment to this post and share ways you’ve had students to create content and reflect on learning through the use of digital tools.  Sharing examples is a great way to get our collective juices flowing and sparks our creativity.  In the process, we’ll learn about a range of new tools and techniques for teaching and learning with technology. Enjoy!